
Journal of Forensic Investigation
Download PDF
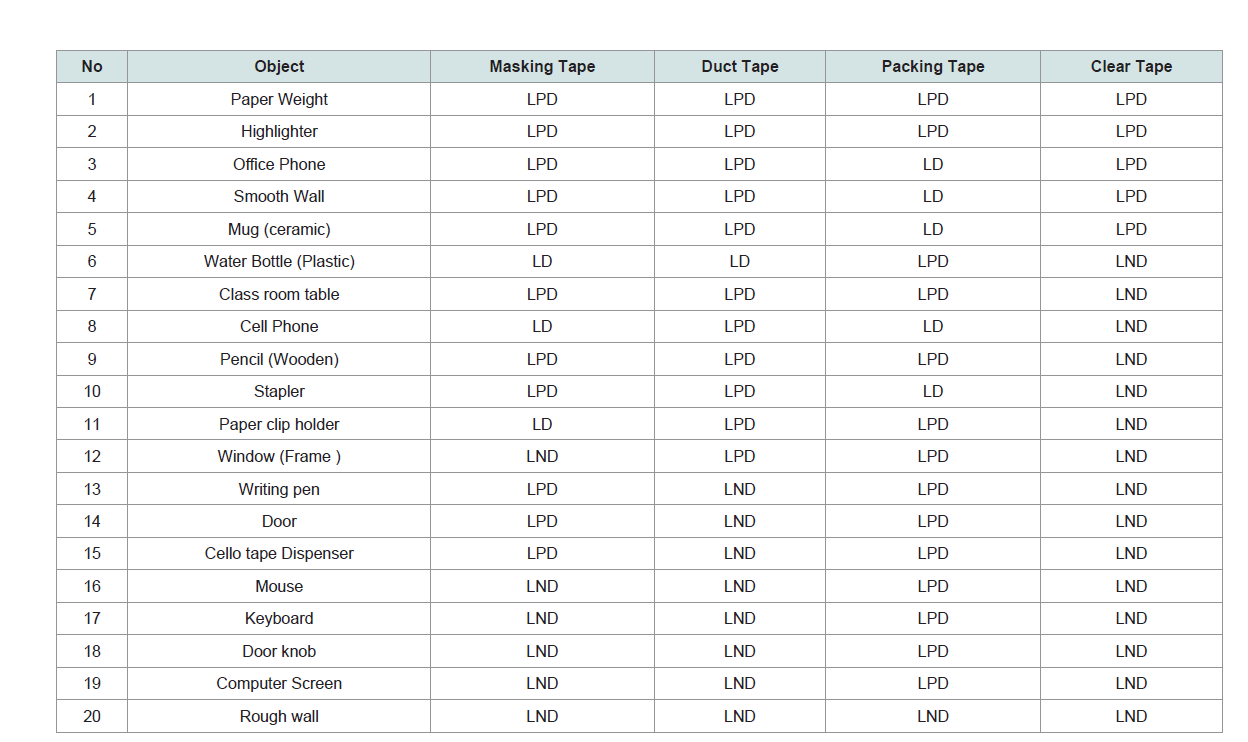 Table 1: Fingerprints on objects lifted by tapes and developed by Adhesive Side developer.
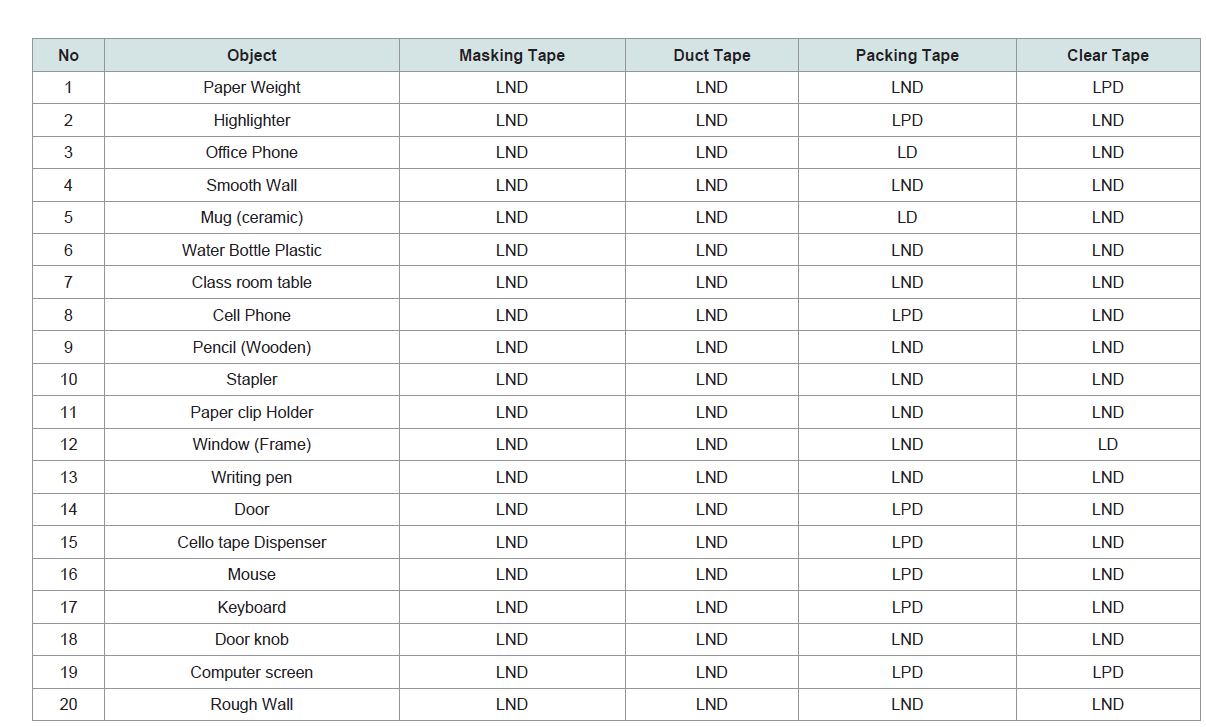 Table 2: Shows the results of the reverse lifting done on objects and developed by Red Powder.
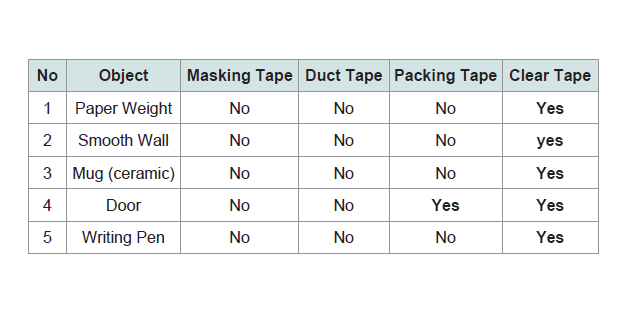 Table 3: Shows the results of the reverse lifting done on objects and viewed by ALS.
 Figure 1: Packing Tape - Developer - Office Phone.
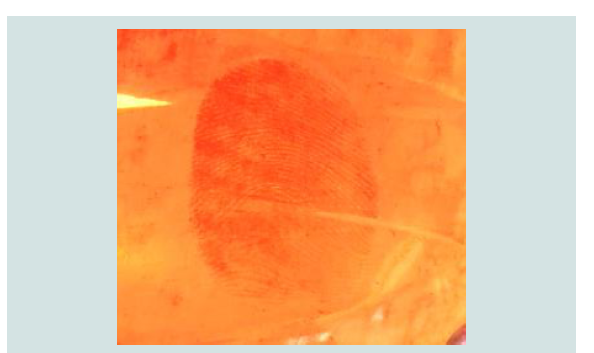 Figure 2: Packing Tape - Red Powder - Office Phone.
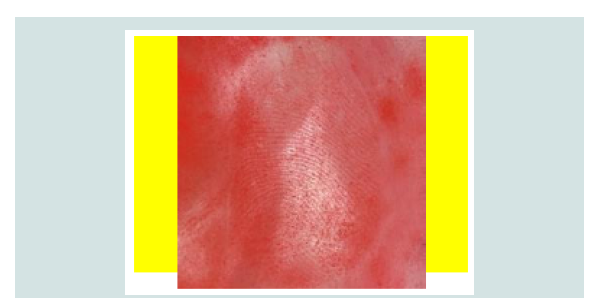 Figure 3: Clear Tape - Red Powder - Window frame.
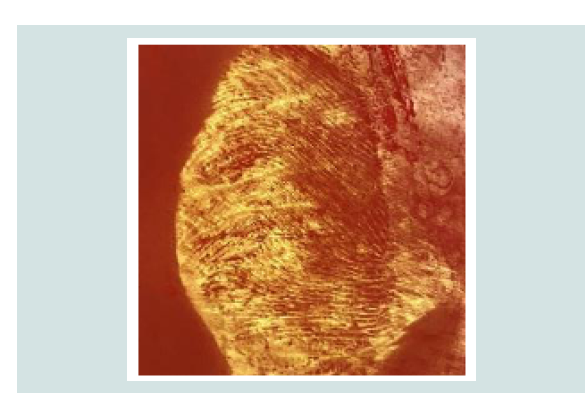 Figure 4: Packing tape - Red Rowder - Mouse.
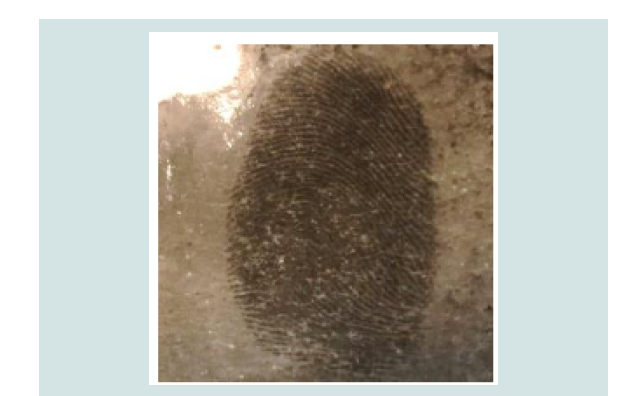 Figure 5: Masking Tape - Developer - Paper Clip Holder.
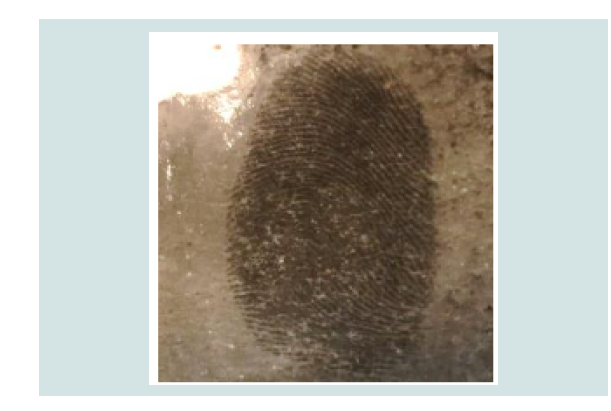 Figure 6: Masking Tape - Developer - Cellphone.
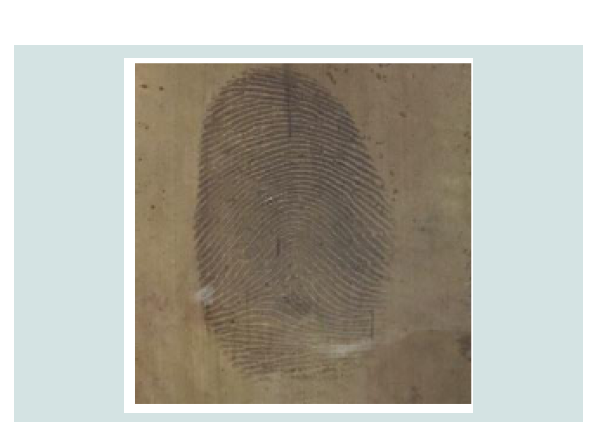 Figure 7: Packing Tape - Developer - Cellphone.
 Figure 8: Masking Tape - Developer - Plastic Bottle.
 Figure 9: Packing Tape - Developer - Window.
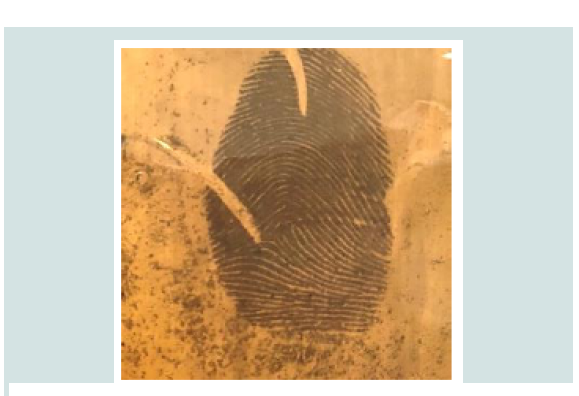 Figure 10: Packing Tape - Developer - Stapler.
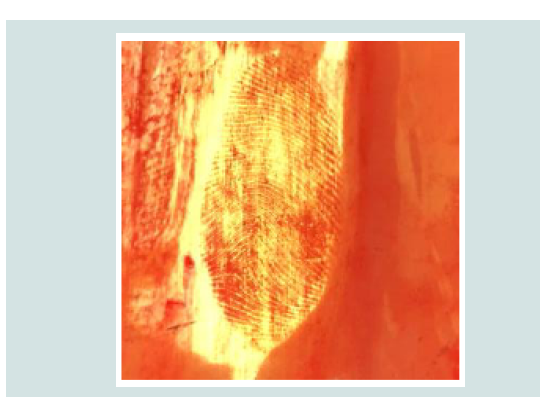 Figure 11: Packing Tape - Red - Highlighter.
 Figure 12: Packing Tape - Red Powder - Computer Screen.
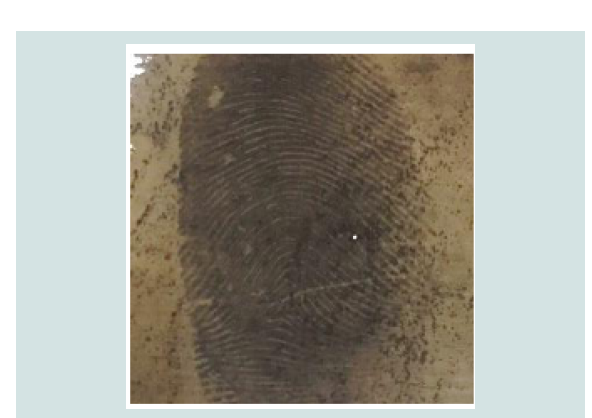 Figure 13: Packing Tape - Developer - Mug.
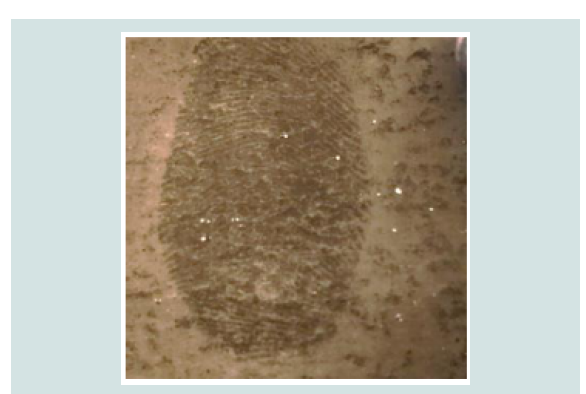 Figure 14: Masking Tape - Developer -Mug.
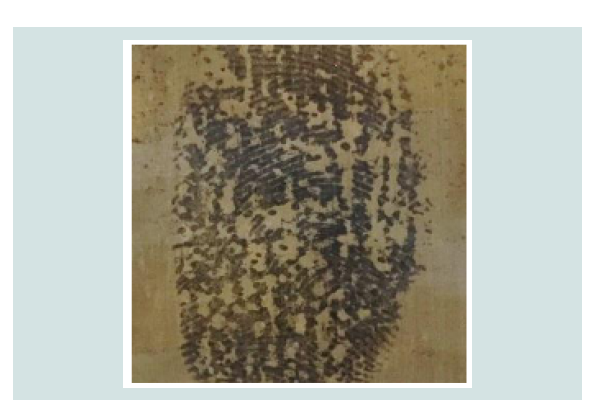 Figure 15: Packing Tape - Developer - Smooth Wall.
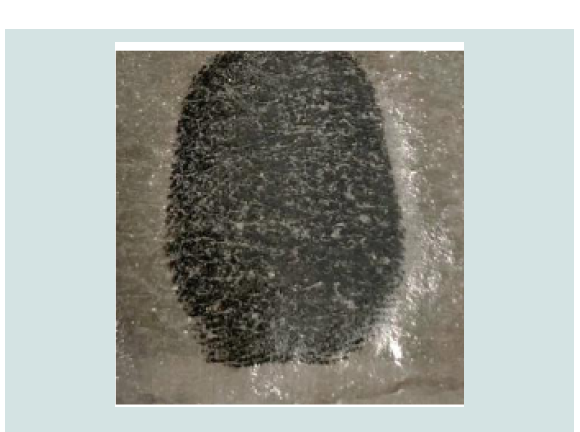 Figure 16: Masking Tape - Developer - Office Phone.
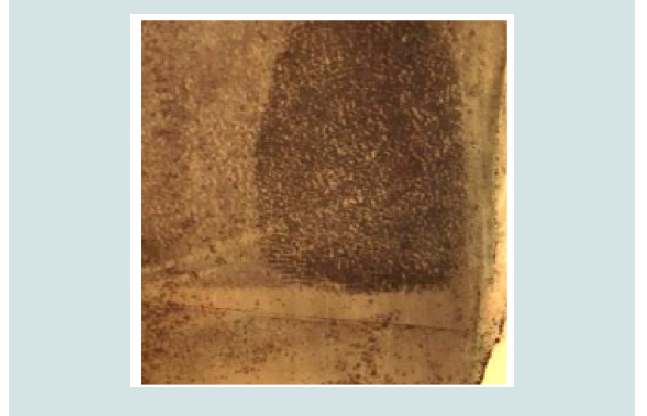 Figure 17: Packing Tape - Developer - Tape Dispenser.
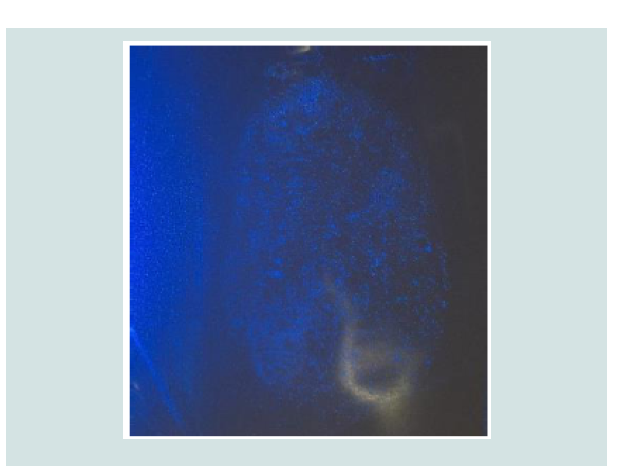 Figure 18: Clear Tape ALS - Paper Weight.
 Figure 19: Clear Tape - ALS - Door.

Research Article
Development of Reverse Fingerprint Lifting Techniques for Forensic Applications
Johnson TC1, Brown AS1, Oommen Z1*, Okafor U1 and Lee Y-J21
1Department of Chemistry and Forensic Science, Albany State University, USA
2Department of Biological Sciences, Albany State University, USA
*Address for Correspondence: Oommen Z, Department of Chemistry and Forensic Science, Albany State University, Albany, GA 31705, USA; E-mail: zachariah.oommen@asurams.edu
Submission: 06-February-2020;
Accepted: 18-March-2020;
Published: 20-March-2020
Copyright: © 2020 Johnson TC, et al. This is an open access article
distributed under the Creative Commons Attribution License, which
permits unrestricted use, distribution, and reproduction in any medium,
provided the original work is properly cited.
Abstract
Latent fingerprint lifting has been carried out on objects to identify
and classify the human touched objects within a workplace, which
can be readily applied for both traditional fingerprint analysis and
microbiome-based forensic identification. A total of 20 objects in a
work place environment, including cabinet handle, cell phone, door
knob, keyboard, mouse, office phone, and stapler, were selected
for this study. Four different types of tapes were used for lifting. The
lifted invisible prints were then observed by three different methods:
1) forensic light source, 2) powder dusting, and 3) adhesive-side
developer. Developed visible fingerprints were then photographed.
Forensic light source made the print visible on clear tape and packing
tape lifted from several objects including paper weight, and door. Red
powder dusting used after lifting was successful with prints on some
tapes. Developing solution showed better results with masking tape
and packing tape. The results showed that the reverse lifting method
worked well with glazed/smooth surfaces such as mug, mouse,
window and door, which will allow investigators to use other forensic
applications including the microbiome-based analysis as well as the
fingerprint lifting on the same object in a crime scene.
Keywords
Reverse lifting; Microbiome; Developing solution
Introduction
Fingerprint evidence left behind by a suspect or victim can identify
who was in the crime scene and what objects she or he touched.
Similarly, it is also possible to identify a suspect from the microbiota
collected from the object he or she touched in the crime scene. The
question is whether it is possible to collect both microbiome and
fingerprint from the same position in the object he or she touched.
The traditional method of development of a latent print involves
the use of powder or chemical treatment, which clearly destroys the
bacterial cells shed by the subject. On the other hand rubbing the
surface of the object for collecting microbiome disturb or destroy
the fingerprint ridges pattern if present on the object. Therefore the
researchers are trying to develop a technique that help collecting both
the fingerprint and the microbiome from the same object without
destroying either of them.
Background
Several researches in the field of fingerprint developing
techniques have been carried out in the past years. The most widely
used visualization techniques for developing latent finger prints are
dusting, cyanoacrylate fuming (“superglue”), ninhydrin spray, iodine
vaporization, and the use of various fluorescent powders. In all these
cases, the applied reagent interacts with the fingerprint deposit to
make the ridge detail visible. Subsequent application of dyes or
illumination with light of various wavelengths made the print visible.
The main drawback in those methods is that the specimen objects cannot be used for other forensic evidences like microbiome.
Forensic application of microbiomes have been gaining
importance as potential means of associating people with evidence
and environments. It has been found that human biota varies
systematically across body habitants and time [1]. Several studies
have reported to the use of microbiome profile characterization for
criminal investigations. The trace microbiome on one’s skin and the
surface of an object one touches can use as a potential means to identify
a person. Humans shed approximately thirty million bacterial cells
into their vicinity every hour [2]. Reported that bacterial community
found on fingertips could be traced on a key board resulting in the
identification of the person who used the keyboard [3]. In another
study showed that personal mobile phones carry personal microbial
signature of their owners [4,5]. Reported postmortem succession of
human associated microbial communities for estimating postmortem
interval for forensic analyses [6].
Therefore, researchers turn their attention toward noninvasive
fingerprint developing techniques as it does not compromise
the sample either for subsequent analysis by other fingerprint
enhancement techniques or using the same sample for other forensic
evidences. However, published results of research in the noninvasive
fingerprint developing field are very limited. Recently, a noninvasive
method of visualizing latent fingerprint deposit on thermal paper
has been studied and published by John Bond [7]. He has shown
that higher intensity UV source gave superior fingerprint visibility
compared to other light sources. Also published another noninvasive
method to visualizing latent finger prints deposited onto thermal
paper by raising the temperature of the paper [8]. In another study,
studied laser detection of latent fingerprints on white paper [9]. They
measured the UV fluorescence of various kinds of printer‐toner and
printer‐ink printed on high grade white paper and found that the
fluorescence intensity of most printed paper is weak, because ink or
toner absorbs the fluorescence of the paper. Fourier Transform Infra
red imaging was used for noninvasive detection of latent fingerprints
[10]. The Infra red images from substrates like trash bags, soda can, copier paper, cigarette butts are analyzed using ENVI® software (RSI
Inc., Boulder, CO). The analysis was further improved by the addition
and subtraction of band intensity, addition and subtraction of band
intensity. Eric C. Bray published a case report stating the method
of developing latent print from duct tape [11]. M.G Campbell in a
technical report showed that the use of a hot air blower can separate
adhesive tapes and permit a more efficient lifting from cardboard
surfaces [12-14].
Traditional methods of fingerprint development are invasive
as the use of powder or chemical treatment on the objects destroy
the other forensic evidences. Fingerprint powders can contaminate
the evidence as well as environment especially in an office set up. In
this context we are proposing a non-invasive method, the reverse
fingerprint lifting techniques, in which there is no powder or
chemical treatment to the object in question, is favored as it does not
compromise the object for other forensic evidences like microbiome.
This research concentrate on reverse lifting method of fingerprint
development where tapes are used to lift the latent print from objects
and areas that prints are suspected. The technique is noninvasive
and is based on how well the oils and sweat that creates a fingerprint
are able to transfer from the object to the adhesive side of the tape.
Powder or chemical treatment would then be applied to the adhesive
side of the tape. This approach will avoid dusting or chemically
treating objects directly and will allow the workplace to remain clean
and healthy after fingerprint collection.
The research is to select suitable objects, that can be successfully
employed for both finger print and microbiome based forensic
identification. The latent print collected from such objects can be
compared with known fingerprints collected from the selected
subjects either with ink or digitally with live scan devices. Multiple
enhancement techniques along with alternate light source (forensic
light source) can be used.
Materials and Methods
Objects:
The method involves collection and processing, which means lifting the latent print from the source and then processing to develop the print. This method is just opposite of traditional invasive fingerprint development called reverse lifting. 20 objects that are usually found in an office set up were selected to carry out the experiment. They are computer screen, paper weight, glass window, computer key board, computer mouse, cell phone, door knob, door, writing pen, mug, paper clip holder, wall (smooth surface) wall (rough surface), water bottle, office phone, highlighter, table, wooden pencil, stapler, and cabinet handle. Red/black print powder, magnetic powder, dusting brush, illuminator, and adhesive-side developer
were used to develop the latent prints.
A forensic light source, Luma-Lite R2000 A, (Dayton Scientific
Inc) at wavelengths 365, 450, 485, and 570 nm is used for enhancing
the visualization. The four different types of tapes that were used
in this experiment were making tape, packing tape, clear tape and
duct tape. Each tape produced different results. The objects and the
developed prints from the tapes are photographed documented by a
Canon EDS REBEL T5i
Deposition of the fingerprint:
Intentional latent fingerprints were placed on each of the 20 objects by placing a finger onto the selected objects for 1-2 seconds with light pressure sufficient to ensure the contact between the finger
and the object. Attention is made to keep the time and pressure same
to all objects to maintain uniform deposition.
Lifting of the fingerprint:
To detect and enhance the fingerprint on the surface, a forensic
light source was used. After the fingerprint is illuminated, if possible,
a photograph of the print is taken. Then the print was lifted with packing tape, duct tape, masking tape and clear tape. The tapes were
then examined under the alternative light source and photographed.
Developing the fingerprint with Light Source:
The lifted print on the tapes which are not visible to the naked eye, require treatment to cause them visible. In this technique used an alternative light source to make the print visible. Then developed the latent print by the application of both powder and adhesive side developers. For this the tape was laid on a surface in a rotating manner. The developer was swabbed over the surface while rotating the application.
Developing the fingerprint with Powder Dusting:
Fingerprint powder is applied to the surface of the tapes bearing
the latent print with a fingerprint brush.
Developing the Fingerprint with Adhesiveside Developer
First the brush is dipped gently into the developer solution and
then slightly swirl over the latent print area in the tapes for 30 to 40
seconds. The adhesive side solutions adhere to the area in the form of
a print. The developer was washed away with water to reveal the print.
A photograph was then taken.
Results
Fingerprints on objects lifted by the tapes and developed by Adhesive Side Developer:
Almost all the fingerprints placed on the objects are invisible to
the naked eye but some are visible under the Alternate light Source
(ALS). Prints are lifted by using masking tape, duct tape, packing
tape, and clear tape and then developed using chemical developer.
Table 1 shows the results of the reverse lifting done on objects and
developed by adhesive side developer.
Adhesive side developer method was successful in developing
prints on all four tapes in the case of From plastic water bottle, class
room table, cell phone, pencil , stapler and paper clip holder, the
fingerprints were able to lift the print using three tapes. Fingerprints
from all the rest objects were lifted by only one type of tape. All the
prints made on the objects were invisible to the naked eye but some
were visible under Alternate Light Source (ALS). Prints are lifted by
using masking tape, duct tape, packing tape, and clear tape and then
developed using chemical developer. Experiments showed that the
quality of the fingerprint depends on the object’s surface and the type
of tape used.
Fingerprints on objects lifted by the tapes and developed by Red Powder:
Of the twenty objects,only 6 developed ridges with red powder
and only a very few objects produced well defined ridges like office
phone, mug, window frame.
Objects lifted by the tapes and viewed by Alternate Light Source (ALS):
Almost all the fingerprints placed on the objects are invisible to the naked eye but some are visible under Alternate light Source (ALS). Table 3 shows the results of the reverse lifting done on objects and viewed by ALS
Discussion
The research mainly deals with quality of the latent prints
developed in the reverselifting method. Latent prints developed
are graded based on the quality of ridge details visible on the
tapes. The grading is numbered from no development (zero) to
fully developed (4) based on the grading by Bandey et.al [13,14].
Fingerprint ridge development on different tapes after the application of adhesive developer solution was graded based on
the quality of ridge detail visible on the tapes. The quality of the
print is expressed by numbers as developed by Bandey [13,14].
Of the 20 objects only 7succedded to produce well defined
fingerprint ridges in the grade 4 category (Figures 1-10). Some are
partially developed as shown in the (Figures 11-13). Some other
cases show the shape of the print with no clear ridge details (Figures 14-17). Moreover some fingerprints are visible in Alternate light source before development (Figures 18 and 19). No print was able to
developed from rough wall. Packing tape appears to be more effacing
in producing ridge details of category [4]. The lifting and developing
efficiency of the tapes decrease in the order packing tape, masking
tape, duct tape and clear tape. Developing agent also influences the
ridge details as it is evident from the figures that developer solution
works better on most of the 9 objects rather than red powder.
Based on the results it is very clear that the developed print
depends on several factors. Quality of the print depends on the surface
of the objects that are touched, condition surrounding the contact
between friction skin and the objects, and also the amount and type
of residue on the skin. It is also based on the substrates on which
the print is transferred. Porous substrates are generally absorbent and
the prints deposited into these media absorb into the substrate and
are somewhat durable. Nonporous surface does not absorb. These
surfaces repel moisture and often appear polished. They include
glass, metal, plastic, lacquered or polished wood, rubber etc. Latent
prints on these substrates are more susceptible to damage because
the fingerprint residue resides on the outermost surface. Semi-porous
surfaces are characterized by their nature to both resist and absorb
fingerprint residue. Fingerprint residue on these surfaces may or
may not soak in because of the absorbent properties of the substance
and the variable viscous properties of the fingerprint residue. These
surfaces include glossy cardboard, glossy magazine covers, some
finished wood, and some cell phones. Latent print secretions are
complex emulsifications of numerous and varying compounds. It
can be water soluble consisting of sodium chloride and amino acids
(Serine and glycine) or water insoluble non-polar lipids and proteins
[15].
Identifiable ridge details of grade 4 are obtained on objects like
Office phone (Figures 1,2), window frame (Figure 3), Mouse (Figure 4), Paper clip (Figure 5), Cell phone (Figure 6 and 7), Plastic Bottle (Figure 8), and Stapler (Figure 10). All the objects of these types have non-pours and polished surface. The finger print residue resides on
the outermost surface and can be easily lifted by the tapes. The ridge
details are continuous and all the minutiae points are easily located.
Packing tape appears to be a good lifter among the four types. Packing
tape is not a good choice for Plastic bottle and paperclip holder.
Masking tape is good for lifting prints from a plastic bottle.
Grade 3 types are obtained for objects like highlighter (Figure 11), Computer Screen and Mug are not fully developed in all areas
of the print (Figure 12 and 13). Only two-thirds of the ridges are
continuous, the rest are discontinuous or dotty. For cell phone duct
tape and developer solution are used. Office phone print is lifted by
packing tape but developed by red powder.
Grade 2 types where one-third of the ridge details are visible, are
obtained for smooth wall (Figure 15), office phone and tape dispenser
(Figure 16 and 17). Those prints only show the shape of the finger
print but not any of the ridge details.
All the rest of the pictures are either not developed or dotty. No
information can be obtained from these types of ridges and belong
to grade 1.
Effects of tapes on lifting:
Masking tape: Fingerprint development on the adhesive side
of masking tape using adhesive side developer have been mostly
successful. The prints are mostly clustered in the middle but ridge
detail is clear on the outer part of the print (Figure 5,6,8 and 14).
Viewing the print under the light source and with the naked eye
was not successful. Developing with red powder has also been
unsuccessful.
Duct tape:
Duct tape has the least fingerprint visibility. The print
is more visible around the outer part. Duct tape only works with
adhesive-side developer and was unsuccessful under the light source,
with powder and with the naked eye.
Packing tape:
Fingerprints collected using packing tape shows
clear ridge details. It works best with adhesive-side developer and
with red powder for most of the objects (Figure 1,2,4 and 7).
Clear tape:
The clear fingerprint lifting tape was specifically
designed to lift fingerprints that will later be used in evidence. Most
of the prints were not developed either with developing solution or
red powder. Clear tape was successful to ALS in a few cases (Figure 18 and 19).
Conclusion
Reverse lifting methods for fingerprint development has been
successfully performed in at least seven objects out of 20 objects
selected for the study. The results have shown that the ridge details
developed in the new methods are comparable to the conventional
methods of fingerprint development. The objects selected for the
study from an office setup can be very well used for other forensic
evidence examination as the method does not contaminate or destroy
other forensic evidences like microbiome. Cell phone, office phone,
mouse, mug, platic water bottle, paperclip holder etc are some of
the objects successfully tested for reverse lifting. Packing tape and
masking tape were able to lift the invisible print more successfully
compared duct tape and clear tape. Developing solution worked well
with those objects compared to powders. Other chemical methods of
development are under consideration for future studies.
Acknowledgement
This research was supported by Award No. 2016-DN-BX-0196,
awarded by the National Institute of Justice, Office of Justice Programs,
U.S. Department of Justice. The opinions, findings, and conclusions or
recommendations expressed in this publication are those of the author(s)
and do not necessarily reflect those of the Department of Justice.
References
Citation
Johnson TC, Brown AS, Oommen Z, Okafor U, Lee Y-J. Development of Reverse Fingerprint Lifting Techniques for Forensic Applications. 2020; 8(1): 8.